
Setting up a Click2Call button on your website (Browser/Desktop Version - Not Mobile)
If you don’t know by now installing a “click to call” button for a Mobile website is as simple as adding a link in your website like this: 704-288-0800. This is a fun feature of HTML, but nothing too special as it only works on a mobile devices and basically just saves the user from pressing a few more keys. The real trick is installing a click to call button that works in a browser like this: . This is much more complicated as the browser itself has to act like a telephone and make the call using VOIP technologies. It’s also much more useful because it means website visitors don’t have to pay their phone company or even have a phone in order to contact you. This is especially handy if you are taking long distance calls or even calls from countries on the other side of the world. It also allows us website owners to track how users interact with our site before they decide to place a call, this gives us a lot of fun information that would all be lost as soon as a site visitor steps away from their computer and makes a call with their phone. You can also integrate click2call with a PBX, herere is as article I wrote on how to setup a PBX.
The Technology Solution
The solution to this problem has finally come and it’s called WebRTC. Simply put it’s a standard that browsers follow that turn them into a media streaming device. This can be anything from a phone to a video conferencing interface. The webrtc protocol allows the browser to access the computers camera and/or microphone (after requesting permission of course) then it basically sends and receives a “stream” of media from any other computer in the world. The technology is still in it’s early stages, and as of today is only implemented properly by the best/most modern browsers - you guest it, that would be Chrome and Firefox. Fortunately Chrome and Firefox have the vast majority of the market in way of users and the browsers that are lagging behind (Internet Explorer) will be whipped into shape in no time, so we can confidently rely on the technology. It’s pretty cool stuff and about dang time we got it!
Installing Your Own Click To Call Button
So, we know the technology behind it - thanks Taylor, but now what???
Implementing a click to call button in a browser by yourself can be a bit tricky, it requires some serious programming skills and knowledge of the telecommunications industry that not too many folks around have. Fortunately for you, there is no need to know all the gory details. I developed a web based application that allows people to easily get the code needed in order to install a Click2Call button on their own website. My apologies for the shameless self promotion of my app, but I have done the research and I don’t see any other applications out there that do Click2Call so well. Anyway, below I have outlined the steps to setup your own click to call button, it shouldn't take more than 5 minutes to get it all setup and get your first call from your website.
Step 1 - Signup.
Go to http://www.ivrdesigner.com and sign up for a new account. After signing up go to your dashboard and click view/edit on the “Default Board”.Step 2 - Setup.
You will be presented with a “flow diagram” of sorts, this diagram is used to build phone systems and we are going to build a very simple one. You will see two boxes (elements) on the diagram, you can just ignore these or delete them. First drag and drop a “Click to Call Element” and a “Outbound Call Element” onto the board. Then Connect the “Click to Call” and “Outbound Call” elements together by dragging the “Click to call” connector onto the “Outbound Call” connector. Finally Enter the phone number you want to ring when a users clicks the Click2Call button and click the “Save” button in the top right hand corner.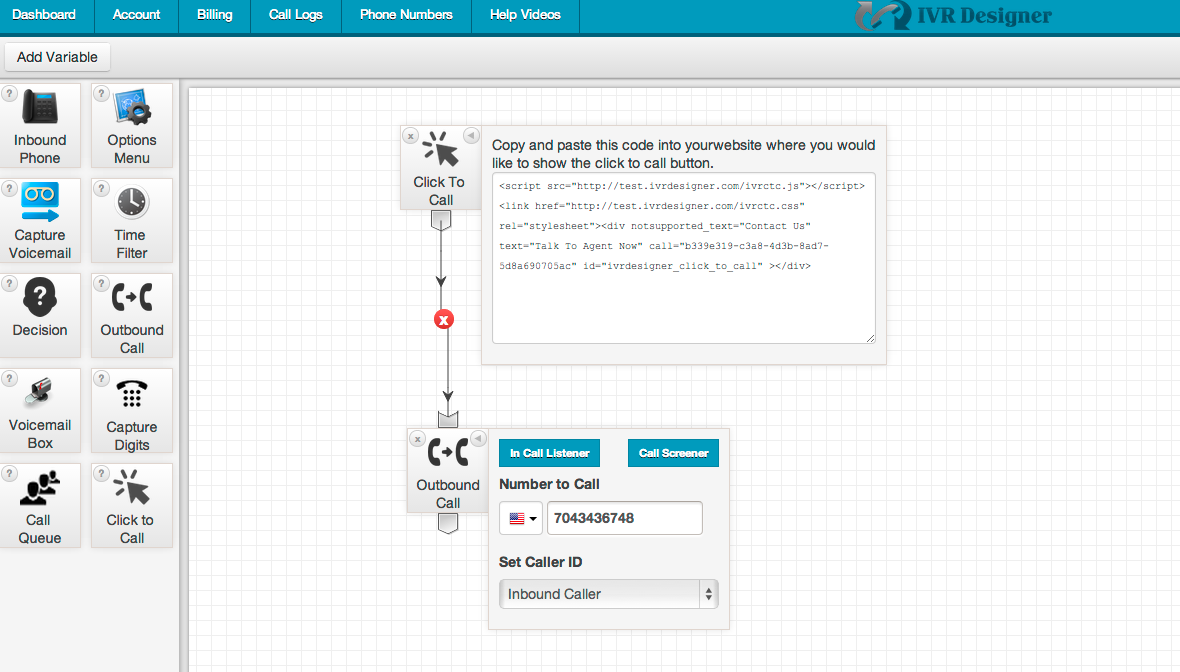
Step 3 - Install.
You will have noticed the “Click to Call” element has some code it asks you to embed into your website - this is all the code you need for your very own Click2Call button. Copy all the code and paste it in your website html wherever you want the button to show up. The code your copying should look something like this: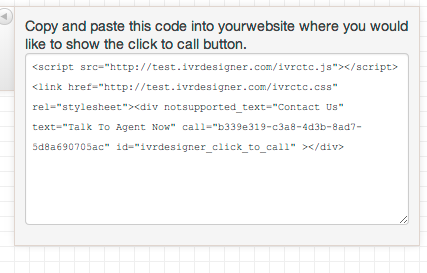
Step 4 - Test.
Give it a try. Click the button, allow your browser to access your microphone and your phone should start ringing. Test out the quality by talking to yourself or have a friend give it a try.
Customizing your click to call button.
There are a few fields in the click to call button that you can customize. In the html code you will see two options that can be customized:| This is the default text that the button will say, change it to whatever you would like. | |
| This is the text that the button will say if the browser does not support Click2Call. |
Styling the button - for those who know their way around CSS/HTML
With a bit of css/html knowledge you can re-style the button to fit your website by including your own css files and changing the styles that have been applied to the button. I would recommend creating a copy of the ivrctc.css file and changing the styles as you wish.
If you have any issue of comments please them below and I will respond as soon as possible.